How to Query SSASMD using #DAX

This is my seventh post in a series of entry-level posts, as suggested by Tim Ford (b|l|t) in this challenge.
I have not set any scope for the topics of my, at least, twelve (12) posts in this blog category of mine, but I can assure, it’ll be focused on SQL Server stuff. This time, it’s a little trick on how to execute DAX via a SQL Server Management Studio [SSMS] MDX Query.

In our current setup, we have both Reporting Services [SSRS] and PowerView Dashboards connecting to our underlying SQL Server Analysis Services [SSAS] cubes. And as we are constantly monitoring the servers, logging which queries are executed, we can tell which ones candidate for optimization. Now, with PowerView Dashboards we do not have the ability to change the actual DAX that gets send to the server. But we can execute the DAX, and trace whether aggregates are missing or if partitioning would be applicable.

Since we have the individual query, it would be nice to be able to execute these manually through SSMS with a SQL Trace running. Admitted, I am a Trace fan 🙂
This is actually possible, with only a little tweak.

In order to execute DAX on a SSAS Multidimensional cube, the Cube property of the connection string needs to be assigned. Here is how to do that.

Open a new MDX Query

New MDX QueryYou will be prompted for server, but before you assign any of that, hit the ‘Options’ button:

Select Options

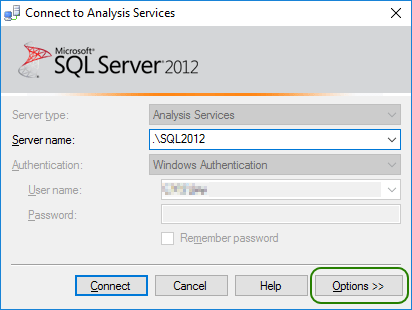
One of the properties available in the connection string is Cube. See full reference of connection string properties here. Select the third tab; Additional Connection Parameters, and assign the cube you want to query.

Assign Cube Attribute

Write your DAX query, in the MDX query window

MDX Query

and execute it to see the results.

ResultAt the time of writing, not all of the queries we are logging are directly executable via this tweak, but we manage to get the long running ones going – which gives us enough insights to potentially fix or at least improve the query execution times.

Hope you enjoyed this little tip.

Loading

How to Quickly Remove Snippet Line Numbers in Visual Studio

This is my sixth post in a series of entry-level posts, as suggested by Tim Ford (b|l|t) in this challenge.
I have not set any scope for the topics of my, at least, twelve (12) posts in this blog category of mine, but I can assure, it’ll be focused on SQL Server stuff. This time, it’s a neat little trick that has saved me a lot of that repetitive delete, down, home, repeat kind of work.

Only too often I find myself searching the web for pieces of code, that I need for some odd solution. And almost every time, I come across a web page, where the code sample is displayed with line numbers. It’s always annoying to have to sit and delete those manually. No longer I say! Yes, you heard me right. Actually Visual Studio has a neat trick to help you get this done in a jiff.

An example of a code snippet, could be the following:

Snippet

Even though the numbers are not highlighted, when we copy from the source, they are still pasted into the destination. To easily get rid of the line numbers, just paste your code sample into a text document in Visual Studio; Pres [ctrl] + [n] and select a text file:

Text FileOnce the file is open, paste in your code snippet:

Paste

Now for the juicy part.
Place your carrot/marker in the first line and first column, on index (0,0) so to speak – See green arrow:

Paste

Now, at the same time, Press [Shift]+[Alt] and mark just behind the last dot (.) behind the “7th” line, as in below screen dump.

Mark

Pres Delete:

Result


Loading

Filtering Tables in #SQLServer Management Studio

This is my fourth post in a series of entry-level posts, as suggested by Tim Ford (b|l|t) in this challenge.
I have not set any scope for the topics of my, at least, twelve (12) posts in this blog category of mine, but I can assure, it’ll be focused on SQL Server stuff. This one os about a neat trick in SQL Server Management Studio.

As a quick tip, this on is one of these tool tips, that just makes your everyday much easier. Sometimes, more than often, you run into databases that contains a huge number of tables – all listed alphabetically. This can, at times, be cumbersome and annoying to browse. SQL Server Management Studio (SSMS) actually has a feature that will assist you in getting your job done, quicker; It’s called Filtering.

When you right-click the table collection node in SSMS, you are presented with the option to Filter.

Filter OptionIn this dialog, you are able to filter the available tables (some can be hidden on account of security) by several attributes. In this quick example, I will just filter out the tables in the Schema: facebook.

Filter Options Dialog

This will lead to a list of tables, where none (Does not contain) of the tables in the Facebook Schema is listed. Tables where facebook is part of the name still shows up (Support.FacebookAPI).

Filter Options Result Right clicking again will allow you to edit or remove the current Filter. The node Tables is also post fixed (filtered), so you won’t be pulling your hair looking for your lost tables.

Loading

How to Change the Service Account for Analysis Services

As part of a routine check, I found that one of our servers had an instance of Analysis Services (SSAS) running under a local service account. As many of our solution pull data from various sources, on other servers, there is almost always a need to do a double hop. To enable that, the service needs to run under a domain service account.

This being a simple task and only a small part of the bigger Kerberos puzzle, I filed a ticket with our support, for them to change the service account to one already existing. The reply I got is the cause of this blog post. I needed to provide the individual steps for the change. A quick googlebing turned up rather empty on specific SSAS guides, to my surprise, so I decided to create on myself (I had to anyhow).

EDITED PART:

As Patrice Truong (b|t|l) correctly called out, the recommended way of doing this change, is to do it through the SQL Server Configuration Manager. To do so follow these steps:

Type [Windows] + [r], in the promt type ‘SQLServerManagerXX.msc’ (depending on the edition XX, 12 for 2014, 11 for 2012, 10 for 2008) – i.e ‘SQLServerManager12.msc’ for SQL Server 2014

Depending on your security settings, you may encounter this next dialog:

UAC


Clicking ‘Yes’ will bring you to the SQL Server Configuration Manager:

SQL Server Configuration Manager

Here you can select (double click) the particular instance you would like to re-configure. Doing so will open this Dialog, where you can edit the login information:

SSAS Configuration Log On Dialog


Change the login information and provide the corresponding password:

SSAS Configuration Log On Dialog Edit


Click OK/Apply and the Service will need a restart for the changes to be applied.

ORIGINAL PART:

This guide will be for Windows 2012 R2, but will be applicable on other Windows versions.

Type [Windows] + [r], in the prompt type ‘services.msc’

Services Prompt


This will open up the Services Dialog, where you can scroll to the SQL Server services listed

Services SQLServer

Double click the Analysis Services Service, and the following Dialog will appear:

SSAS Service


Click the ‘Log on’ tab

SSAS Service LogOn


Change the account to the desired domain account and type the corresponding password

SSAS Service LogOn Edit


Click OK/Apply and the Service will need a restart, before the changes are applied.
Happy hopping 🙂

Loading

Filtering SQL Agent Jobs

I suspect that any developer who has been near a SQL Server for more than just a short while, you will be able to recognize a list of SQL Agent jobs that can no longer can be seen in its full extent without having to scroll.
A tip to make it easier for yourself is that you can filter the list.

Just right-click ‘Jobs’ and select Filter->Filter Settings and you’re off.

Looong SQL Agent Job List

 Then punch in the filtering you’d like to have

SQL Agent Jobs Filter

And voila, your list of jobs are filtere to show only the ones you want:

SQL Agent Jobs Filtered

Loading