My session will be evolving around Azure IoT Hub, a Raspberry Pi3 device running the latest Windows 10 Core operating system. So if you want to know more about the options for Internet of Things in Azure.
If you are in the neighborhood, you should definitely check out this single day, _free_(!), event – all about SQL Server. There are a number of great sessions, and as usual, you will find it hard to build your own schedule; Deciding which sessions to attend, is always a task of picking only one session out of several really good options for the same time slot. This event is no different.
Training Days (Thurs-Fri)
To fit in more content, this year the event has two days of full training days on Thursday and Friday. Spaces on some of the training are limited to under 30 and book early to avail of additional discounts.
Click on one of the training days below for full details
For some time I have been wanting to create a fun, engaging project with my two daughters, age seven and nine. As summer came to an end, they both began talking abort costumes for Halloween, and we even have a kind of get-together in one of their classes – with costumes and all.
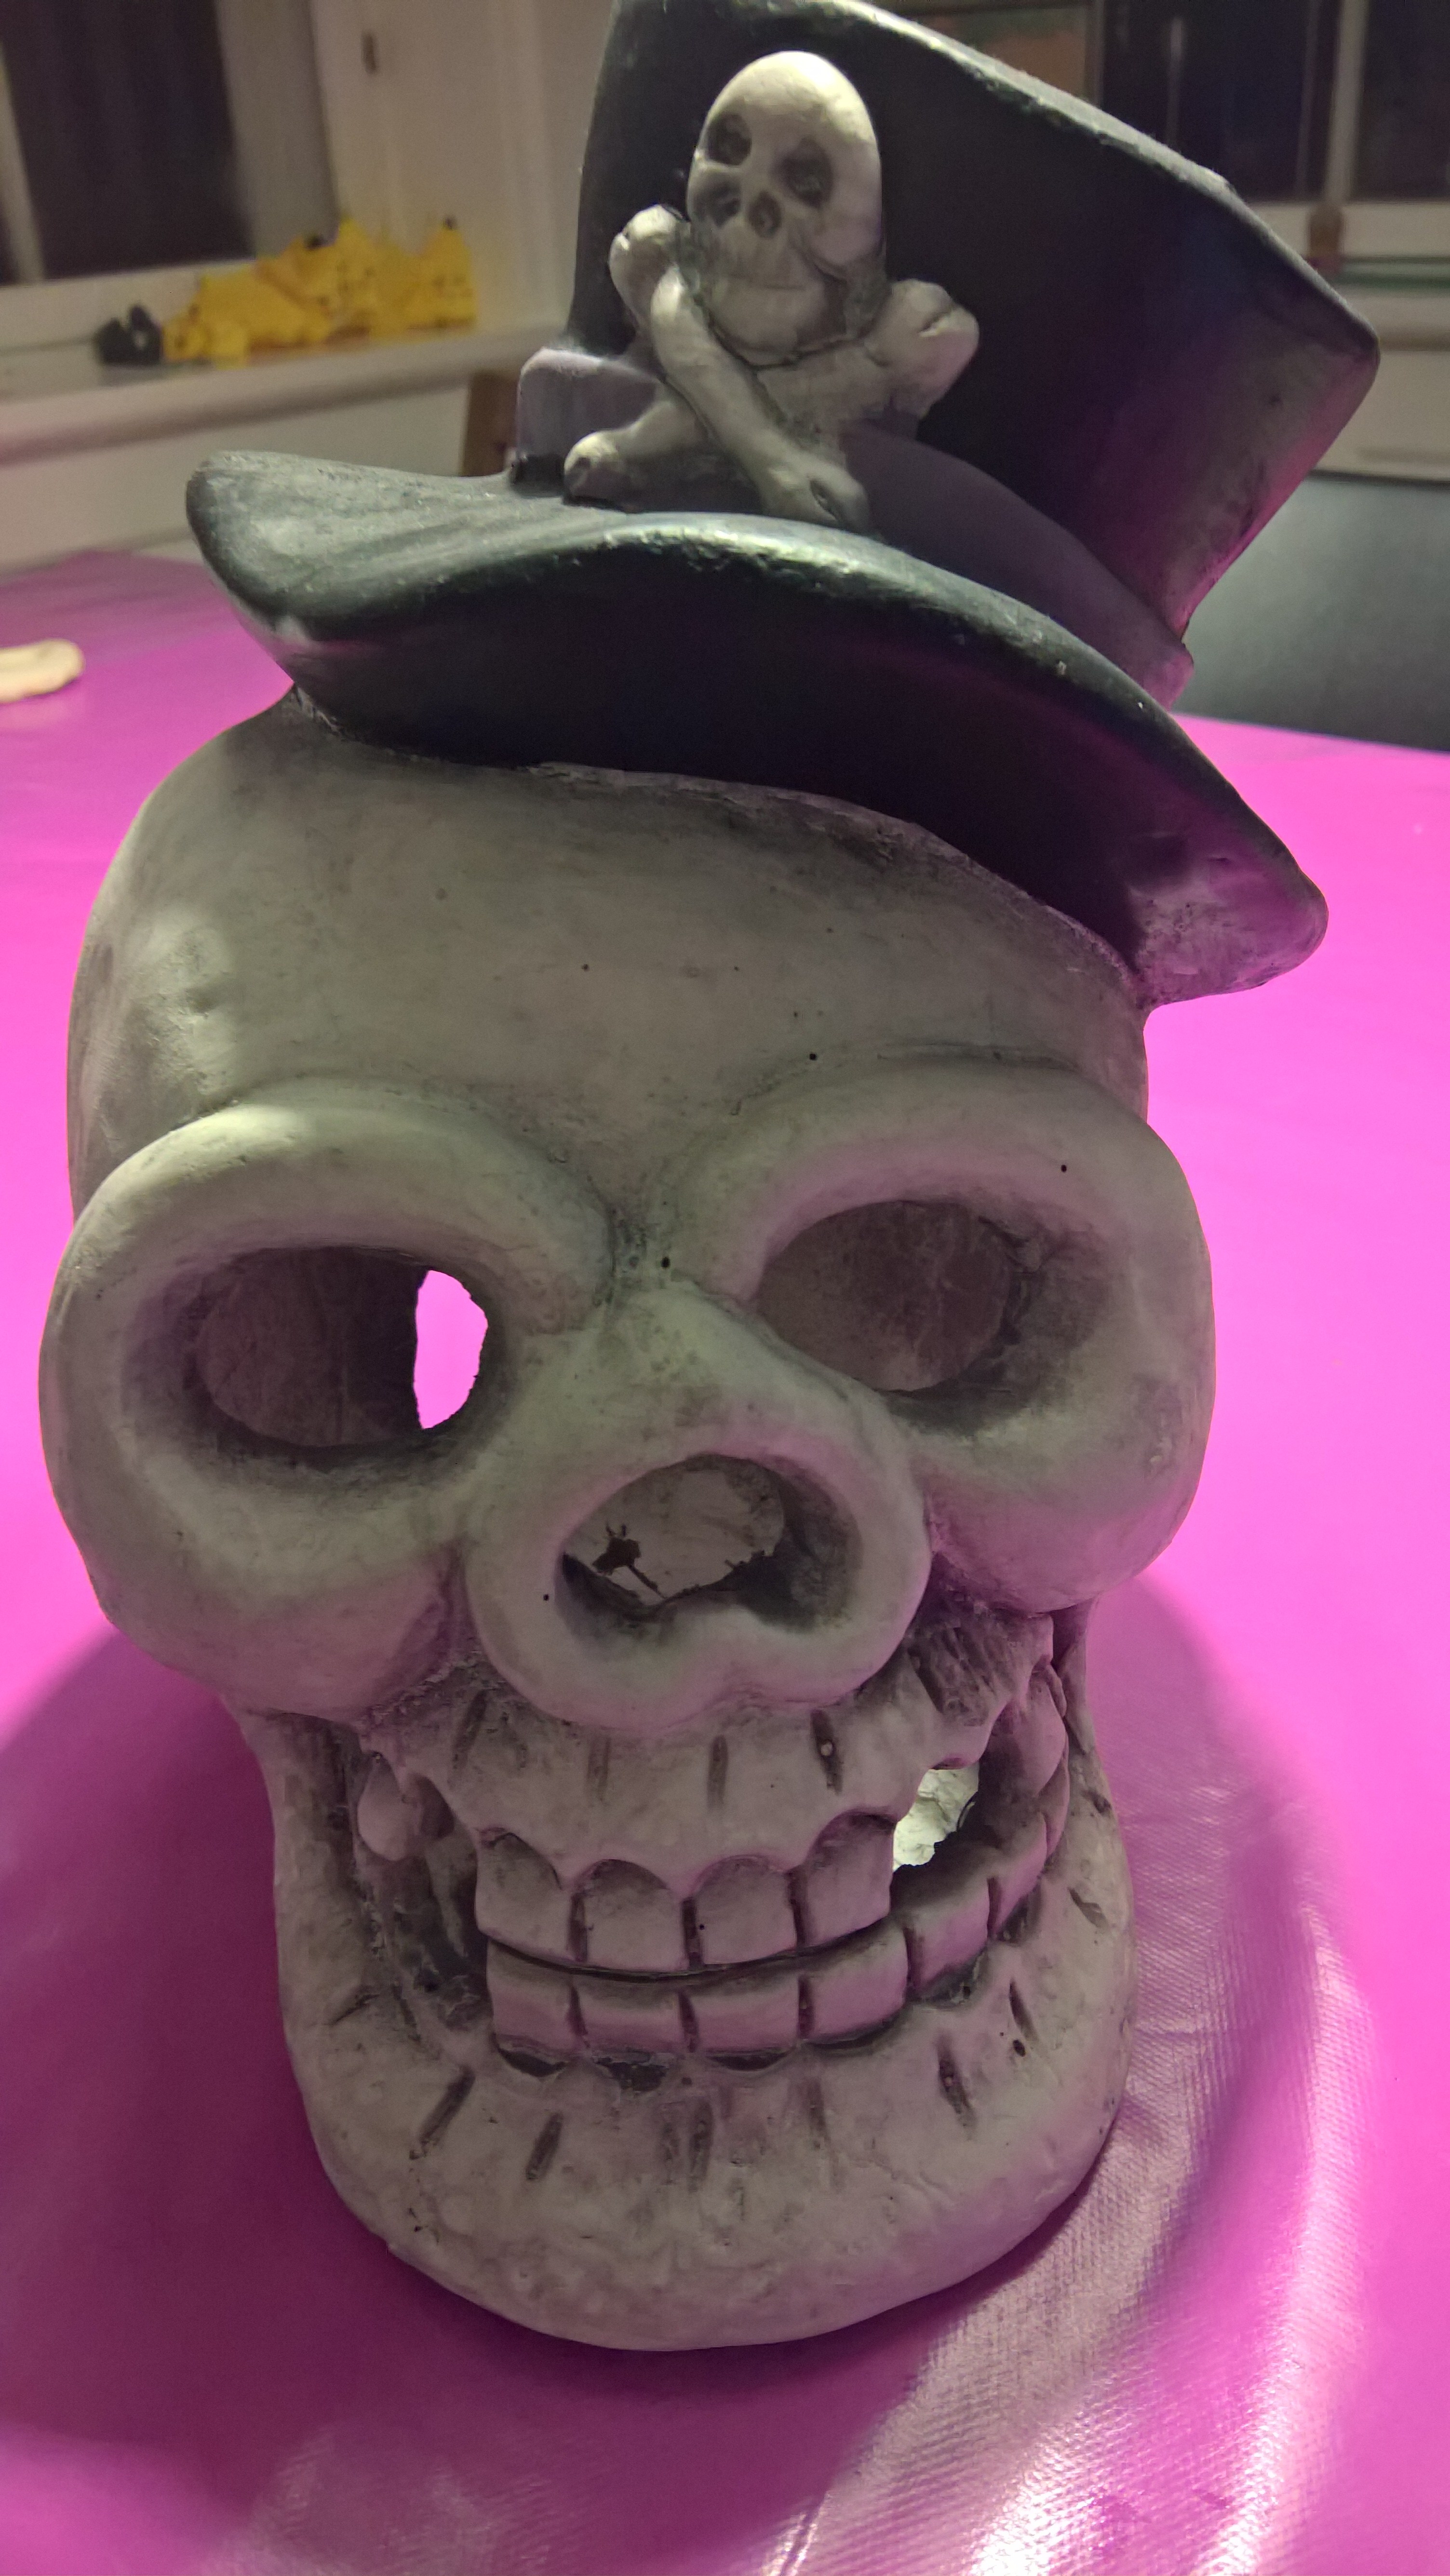
Traditionally this is not a massively celebrated holiday in Denmark, but it’s on the rise and more and more are trick or treating. So it struck me, that we needed to have some device that would detect whenever someone approached the front door, they would be greeted by something spooky and/or frightening. Enter Skull!
I will be placing the RPi along with a PIR Sensor inside the skull. On account of size vs volume, the loudspeakers will not fit inside. I bought a standard set of computer loudspeakers which even came with a subwoofer, at a bargain of just DKK 200 ~ $30. I’ll have none of that portable speaker stuff – I want a lot of dB.
A bunch of nasty and creepy screams have been downloaded, and will be used those to scare of any trick or treaters. Only thing to keep in mind is, the Windows 10 Core supports only .wav files out of the box.
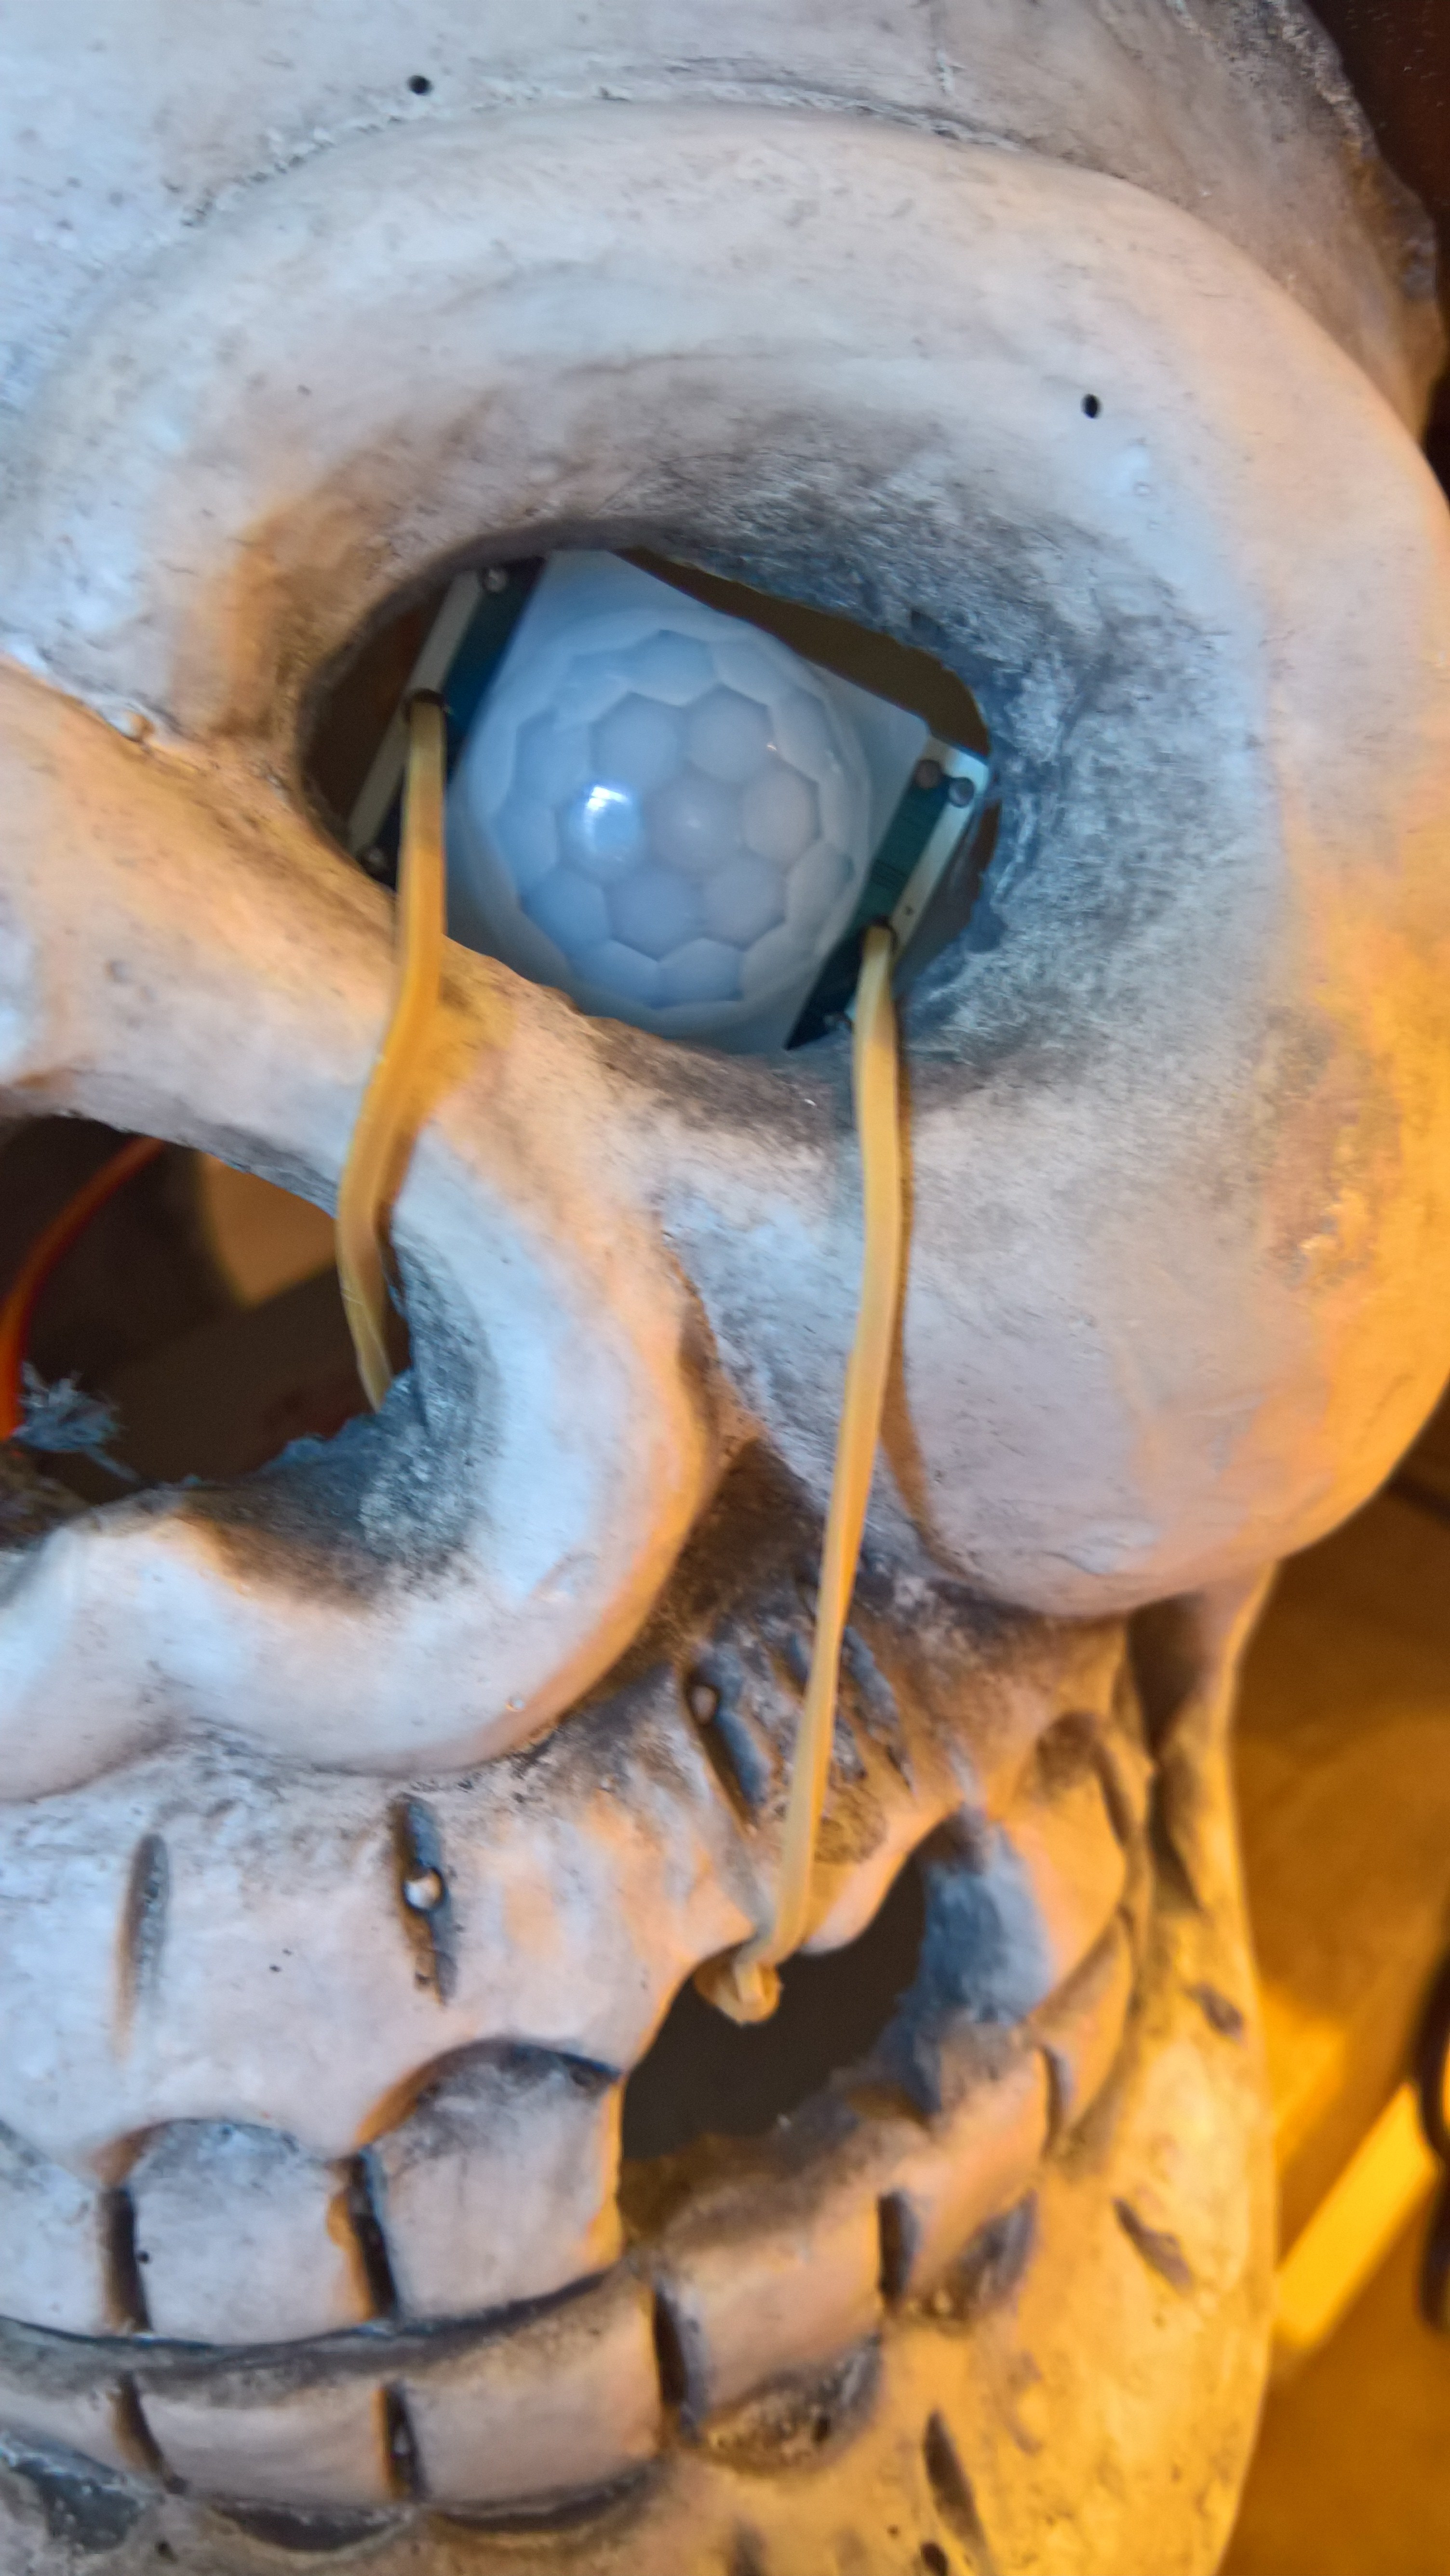
In basic steps, the code will fire up, start listening to GPIO(4), where I hooked up the PIR sensor. Once the sensor detects a change, an event gets triggered, and a random sound bite will be played. After each sound bite, there is a period of 5-10 seconds of non-detection, where we ignore the sensor’s readings. After end non-detection, the PIR sensor reading can once again trigger a new sound bite.
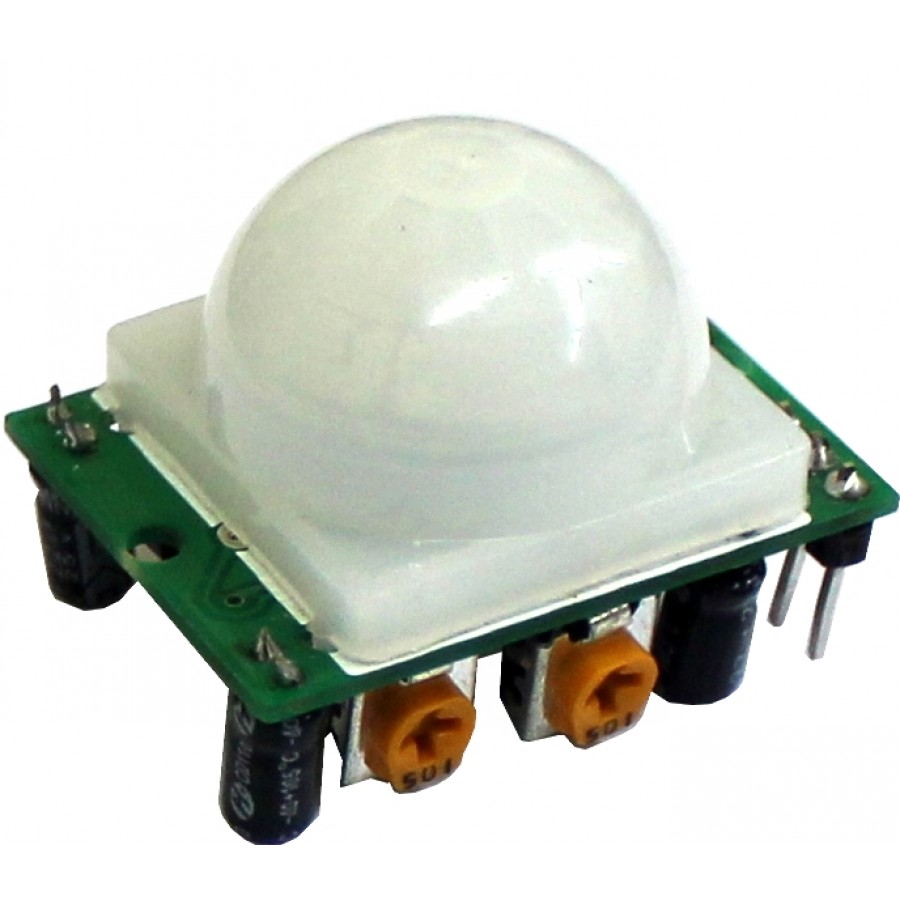
The PIR Sensor is real easy to work with, as it requires only power, ground and then you get the read out.
I will post a video of the skull in action, once Halloween is over. This is how the Skull looks with the PIR Sensor attached with rubber bands. It’ll turn Cyberdyne eventually…
PS: I have experienced a few hiccups during even this simple development process. Deploy from Visual Studio is as touchy as a teenage girl on a first date. It’s clear that development capabilities on the IoT platform is in the early stages. Error messages are funny, at best. Often they are really, really confusing.
The one thing I was spending most time on, was actually to get the BackgroundMediaPlayer to play. Turns out the attribute AutoPlay has to specifically be set to false. WTF?!
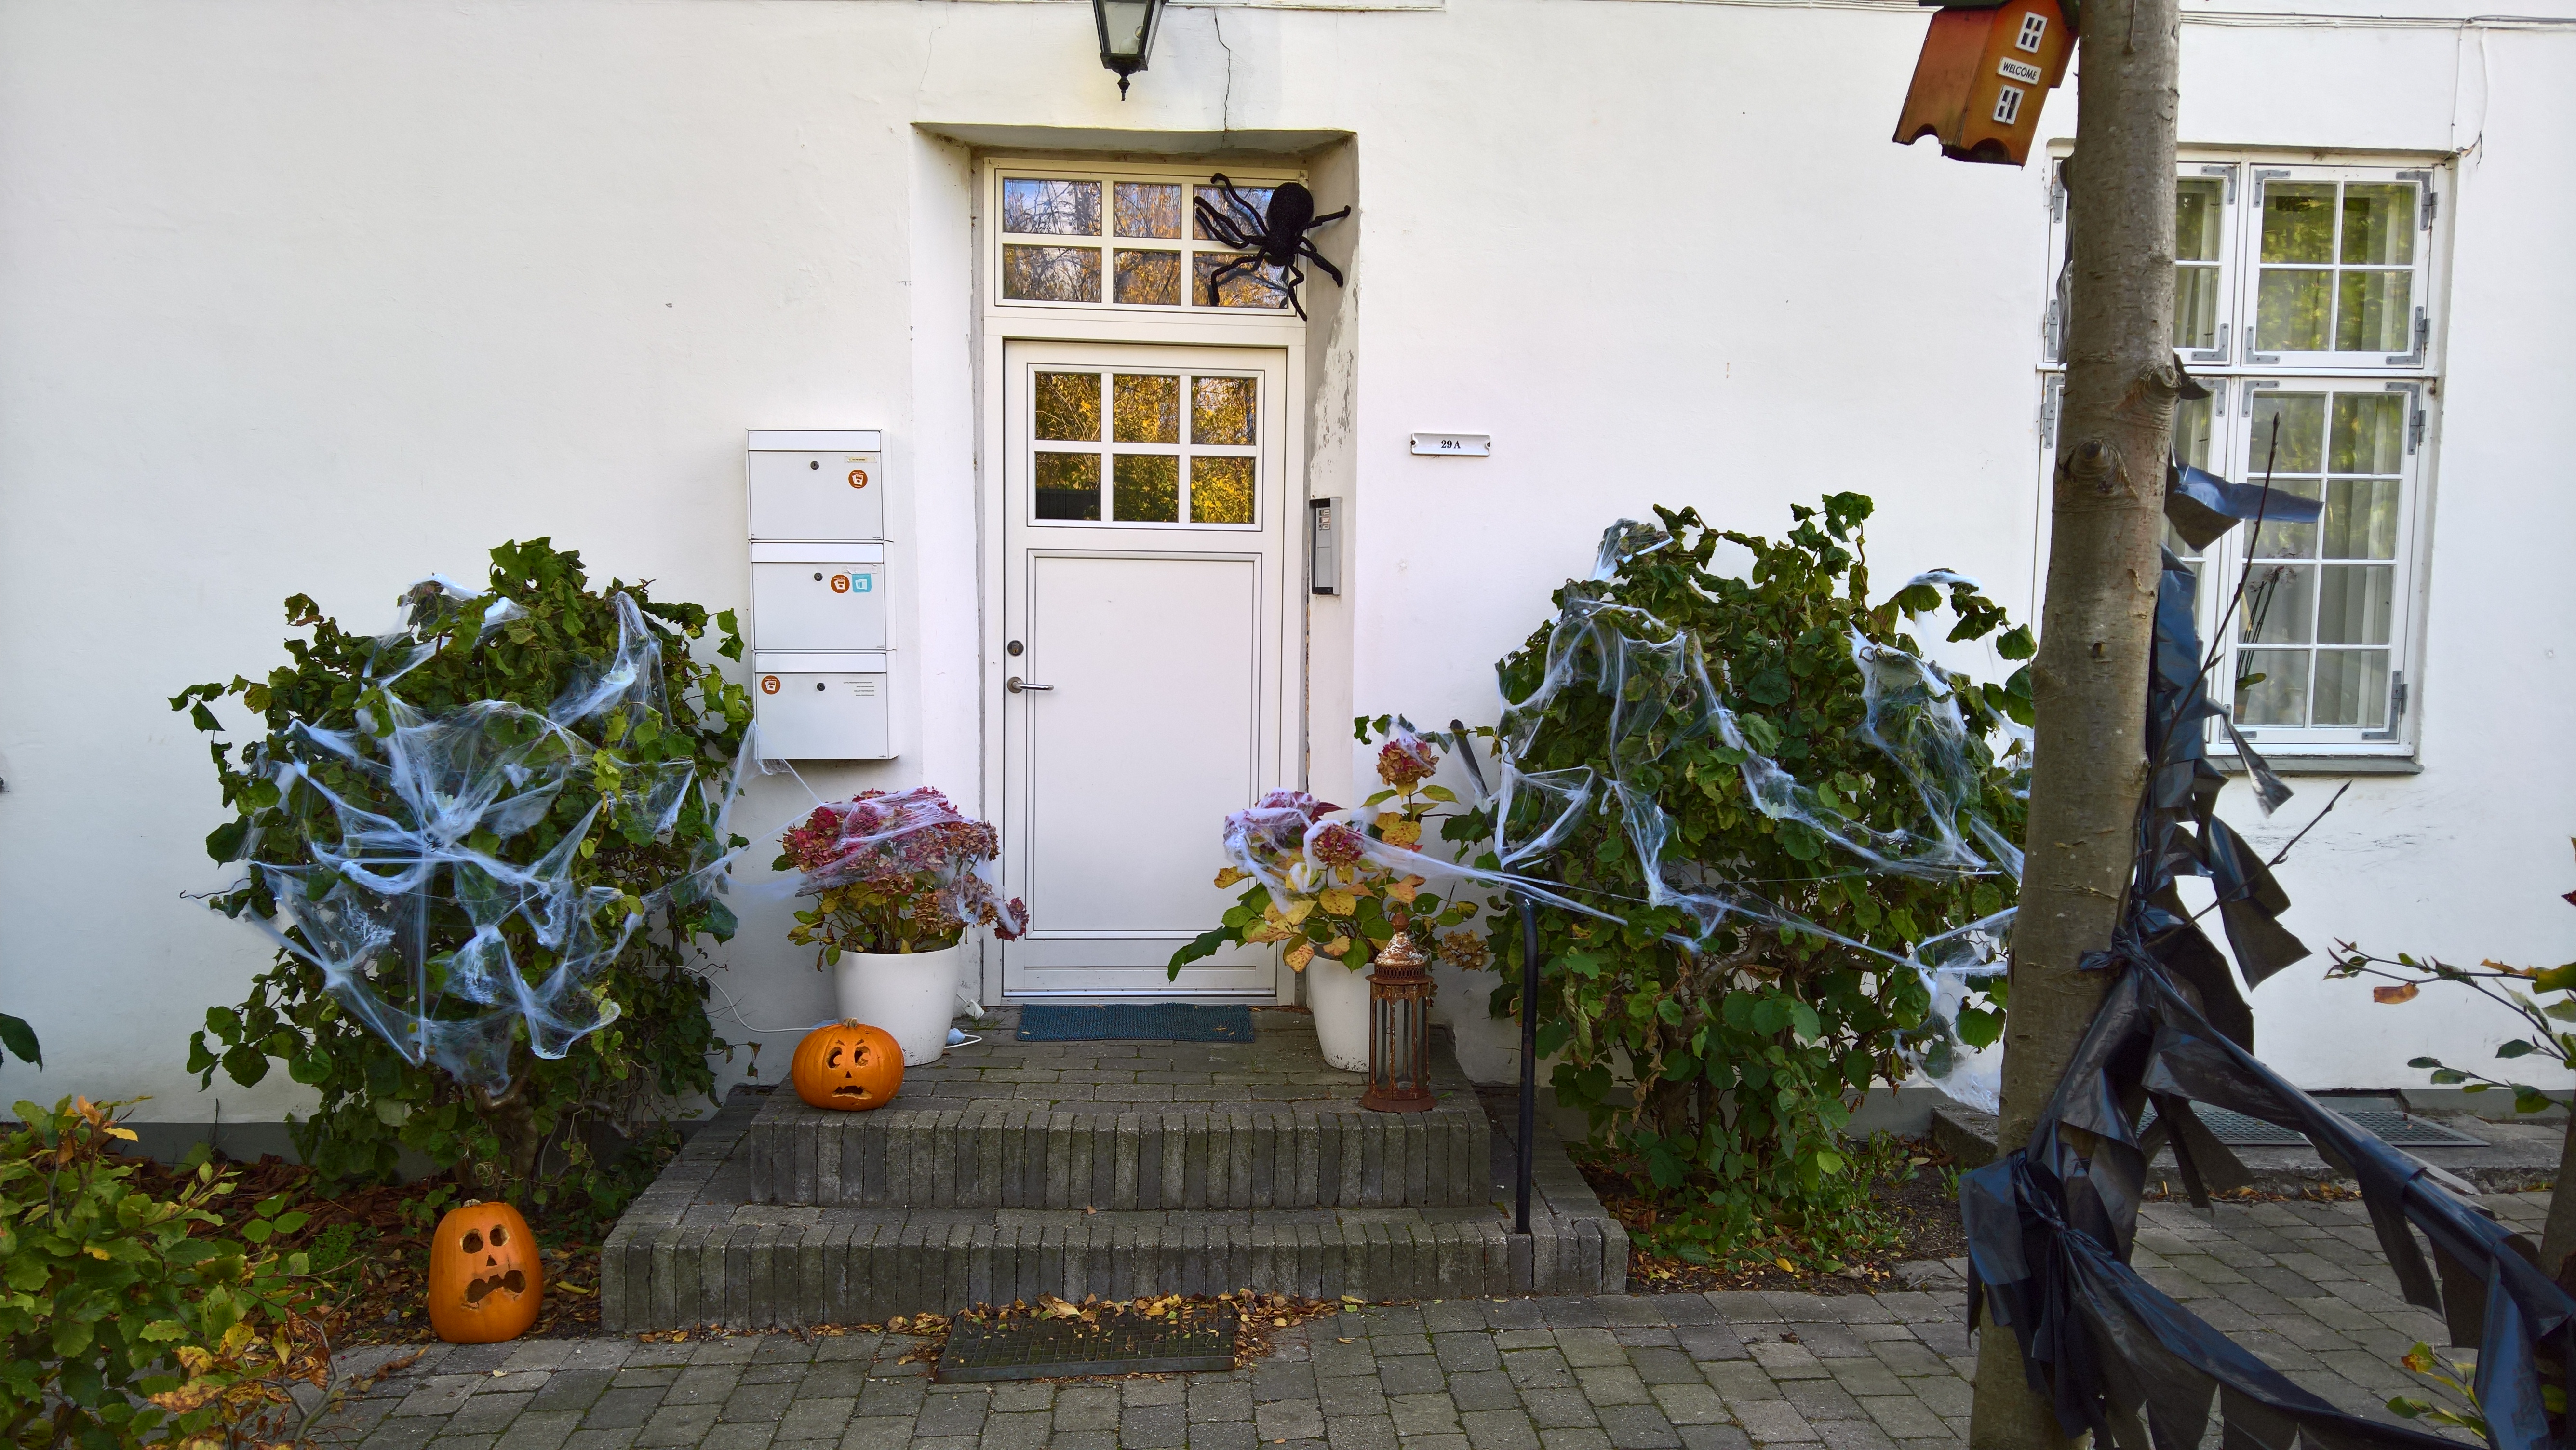
Well, here is the setting for the Skull – I am thinking it sitting right between the two pumpkins.
This is part two, in my series on my first IoT project. The first part described how I got here, and this post is going to be about getting ready to jump in.
I doesn’t look like much, and to be honest, I was surprised how small it was – it’s 85 x 56 x 17mm. A couple of months ago, I backed the Wino Board on Kickstarter – and that was a really small board – so I know what a small board looks like.
Me being too lazy to pick up another programming language in the following months, meant that I didn’t get started with the Wino Board, but with the release of Windows 10 Core for Raspberry PI, I could jump right in programming C# – Which I am already proficient in.
Getting the board is one thing, and if you were to plug it into a monitor and feeding it power, you would end up with a screen like this:
Also note, if you provide a faulty OS on the SDHC card, this is the screen you’ll be seeing.
OS
Next step is to get the Windows 10 IoT Core OS installed on a micro-SDHC card and then plug it into the Raspberry Pi 3. Following this link, you will find all the available release images from Microsoft. Get both the IoT Dashboard and the proper Image (which currently is for the Raspberry Pi 2) – Microsoft has a really good guide for this, right here.
Note: You will need to become a Windows Insider, in order to get the latest Raspberry Pi image.
I had to install the image twice, using the IoT Dashboard the second time (not the first time) – which I recommend – that is, using the IoT Dashboard 😉
If you make it this far, you’ll see the below image when connecting power and monitor:
Development Environment
Having the right development environment setup is also both an important part, but with Microsoft also a very easy step to complete. In a few easy to follow steps, you can, free of charge, start developing code to run on your Raspberry Pi 3.
You will of course need the latest version of Windows 10 – If you are not running the latest, or Windows in an earlier version, you can easily run this as a virtual machine either by using Virtual Box or follow this guide by Kennie Nybo Pontoppidan (b|l|t), to set up a Hyper-V environment.
Once you have your environment up and running, you will be needing Visual Studio. Consider yourself lucky! Microsoft is actually letting you have the Community Edition for free.
To be honest, this one was a bit tricky for me, since I already had multiple versions of Visual Studio installed on the same laptop. So I didn’t download and install the Community Edition as mentioned above. I already had Visual Studio Enterprise installed, from my MSDN subscription. If you don’t know what an MSDN Subscription is, please check out the benefits here.
To be able to develop code to run on the Raspberry Pi, we need to ensure that Universal Windows App Development Tools are installed. I had to re-run the Visual Studio installation, in order to add the features to my installation.
First you re-run the Installation process:
I have highlighted the feature you need installed. If you try to create a project before installing this, you’ll probably get this error message (I did!):
Once the above feature has been installed, you’ll need to download and install this Visual Studio Extension (not only for C#). It’s the project templates for Windows IoT Core Applications. And now you’re all set to go, when you create a new project in Visual Studio:
Next
In the next bit of this introduction to programming your Window 10 Core IoT with C#, I will be looking at how to deploy my first project to the device and see it running.
I grew up in a home full of Electronics. My Father (✩ 1940 – ✞ 2014) was an avid Ham Radio operator (OZ5WQ, OX3WQ), and had been since he build his first Crystal radio, back around 1950. He then made a career in Electronics, at one point stationed in Greenland, fixing everything from Beogram 1200 to Furuno Radars while keeping the Local Power Plant and the Radio Beacon on Simiutaq Island running. By then, 1970, he had achieved Top Continental Scorer in CW, continent being North America, and had become a key player in local Ham Radio Communities.
Et billede slået op af Jens Vestergaard (@jens_vestergaard) den
You can only imagine what odd and crazy antenna designs the rest of the Family had to put up with, peeking at contest periods. His hobby eventually turned into work, and he and a partner created a, at the time, very advanced piece of equipment. Their machine allowed press photographers to send a developed image back to HQ via a land line, in just 3½ minutes, from anywhere in the World. The speed of which they could deliver an image, was a key selling point. The Picofax is depicted below:
Ever since I was very young I was, as I guess most kids are, fascinated by the work my dad did. So naturally, I developed an interest in Electronics and Computers – As long as I can remember, we have had at least one Computer in the house and I think it began with the Commodore PET. That’s the first one I really remember – Playing Lunar Lander. This keen interest is now finally turning into a real project.
Currently I live with my family in a house, where we are sharing the three (3) washing machines and a dryer in the basement. For years we have had to read and note a power meter when washing started, then read it again when you are done, noting the end figure. This way we could keep track of who washes and how much. Once a year, all the readings are put in an Excel sheet and past usage is turned into a new distribution key. Each appartement then pays accordingly, to help keep the machines running and put aside a small savings for new machines as needed.
The fact that people sometimes forget to register usage, and that some owners have a hard time reading the power meter in low light conditions lead me to think, that this would be a truly great candidate for IoT on a very small scale. Perfect for getting hands-on.
My idea is, to setup a Raspberry PI 3, running Windows 10 IoT Core, attach current sensors as well as an RFID card reader. This in combination should allow me to read the power consumption and with some simple logic (thinking Finite State Machine (FSM) right now) be able to log usage and user information to a SQL Azure Database. On top of that Power BI reporting will make a nice graphic representation of each users usage on all available dimensions.

 I doesn’t look like much, and to be honest, I was surprised how small it was – it’s 85 x 56 x 17mm. A couple of months ago, I backed the
  Also note, if you provide a faulty OS on the SDHC card, this is the screen you’ll be seeing.
 I have highlighted the feature you need installed. If you try to create a project before installing this, you’ll probably get this error message (I did!):
 Once the above feature has been installed, you’ll need to download and install
  Next
Next