Backing up your VM’s in Azure on a Schedule

This is my tenth post in a series of entry-level posts, as suggested by Tim Ford (b|l|t) in this challenge.
I have not set any scope for the topics of my, at least, twelve (12) posts in this blog category of mine, but I can assure, it’ll be focused on SQL Server stuff. This time it’s going to be about how to backup your VM’s in Azure with the Recovery Services Vaults.

Previous Posts in Entry Level Serie:

Introduction

Finding yourself up that creek w/out a paddle, is not something you should strive to achieve. Hence, do your backups so that when that brownish thinghy hits the rotating cooling thingy, you are able to dodge the bullet in style.

Via the Azure Portal this is actually quite an easy setup. We begin by defining a Recovery Services Vault. If the offering is not immediately available, search for it like this:

searchYou can select to toggle it as favorite, you may want to check back regularly to see if your backup job is running as expected.

Clicking the Recovery Services Vaults presents you with the next dialog. Here you can view all the services you may have running. You can also Add new ones which we are going to do by clicking the Add button.

add

Next dialog lets us set a couple of basics about the service, such as name, resource group and do keep in mind which subscription you are working on, if you have more than one available. Click Create when all attributes are in place.

basics

Once the deployment is complete, you’ll see the notifier alerting you, that deployment has been successful.

deployment

Back to the Recovery Services Vaults, where we can Refresh and observe the newly created Recovery Services Vault.

Test Recovery Service
Now it’s time to add some server to be backed up. By clicking the newly created Recovery Services Vault, Test-Recovery-Service in my example, we get to the overview of the service. Here, we select the option/pane Backup:

Backup Pane

In this wizard we are presented with three (3) areas of configuration; First we need to decide if it’s in Azure or On-Premises. By selecting Azure, we are left with only Virtual Machine as the only option for the backup. On-Premises has more options, SQL Server, Sharepoint and Hyper-V VM’s among others. This example will be about Azure VM’s, hence we selected accordingly.

Step 2 is about the backup policy, or in other words frequency and retention. I am going with the default settings here, but options are great as you can configure retention range for weekly, monthly and yearly backups in parallel.

Backup Policy

When a new backup policy is created, it automatically becomes an option in other Recovery Services Vaults.

In Step 3 we select which VM’s are included in the Vault.

Items to Backup


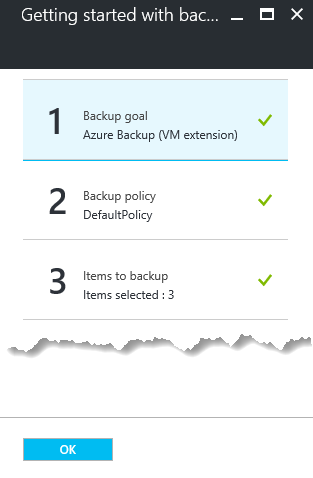
Finally we check everything is as we want it to be and click OK.

Final Wizard

Going back to the overview, we can now observe that the job has been scheduled according to our backup policy definition. Also observe that the backup usage is right where you want it to be, to track and monitor.

Overview

And by clicking the “Azure Virtual Mach…” we get the following overview/status.

Status

But when the job has completed, at the specified time, you will see the time stamps as to when the backups were executed.

Status Final

In my humble opinion, this is so dead simple and easy it’s almost scary – I fear I am missing something, but I seriously doubt it. You might want to keep an eye on spending though, especially if you set up a high frequent backup schedule with a long retention. It can become pricy, but is very reasonable for small installations like this.

Loading

Creating a Striped Disk on Your Azure VM

This is my eighth post in a series of entry-level posts, as suggested by Tim Ford (b|l|t) in this challenge.
I have not set any scope for the topics of my, at least, twelve (12) posts in this blog category of mine, but I can assure, it’ll be focused on SQL Server stuff. This time, it’s a little trick on how to make life easier for SQL Server on an Azure Virtual Machine. This tip applies to standard on-premises setups as well, although it’s not always as easy as running a PowerShell script to magically conjure a bunch of disks, on your own servers.

Prerequisites

In order to leverage this tip, you will need an Azure VM (or an on-premises server, where you can add disks) and some administrative permissions.

Things to do in Azure

First of all, you need to add the Data Disks to you Virtual Machine. This can be done in two ways; (1) You can do this through the Portal. Select the VM you want to work with, click All Settings->Disks->Attach New.

VM Disk Configuration

This will bring you to the final dialog, where you punch in the specifics for your new disk.

Disk Specifics

Or you can do it using Powershell, using Add-AzureDataDisk.

Windows Server

Once the disks have been attached to the VM, it’s time to do some magic in Windows. Mind you, a long series of screenshots. First, you’ll have to create a Storage Pool, next configure a Virtual Disk and finally a Volume (Disk).

It all begins with in the Server Manager, where this illustration should take you through the steps to create a Storage Pool:

Storage Pool Wizard

Storage Pool Wizard

Once the Storage Pool is created, you head on to create the Virtual Disk:

VIrtual Disk Wizard

Finally you need to create a new Volume:

New Volume Wizard

Benefits

The obvious benefit is throughput. The more disks you add to your stripe, the more theoretical throughput you’ll get. As an example, is ran a very quick test, using CrystalDiskMark

Beware: Do not use the installer, as it contains adware. Get the portable edition (.zip).

Disk Stripe ResultAs displayed in above screen shots, the single Azure Standard Storage VHD gives you (as promised) about 500 IOPS. Striping eight (8) of those, will roughly give you eight (8) times the IOPS, but not same magnitude of [MB/s] apparently. Still, the setup is better off, after, rather than before!

Do mind, that there are three levels of storage performance; P10, P20 and P30. For more information, read this.

Loading

Everything Microsoft BI (as of late)

Lately Microsoft seems to have stepped even more on the gas, releasing amazing features upon features for both SQL Server 2016 and Power BI as well as their Cloud platform Azure. This blog post will run through some of the features I find most interesting, in the latest couple of releases. With that said, Microsoft is realeasing new features on a weekly basis for the Power BI service, on a monthly basis for the Power BI Designer and have made three Community Tech Previews (CTP) available over summer for SQL Server 2016.
Just back from PASS Summit and I am a happy Camper, full of all the great new stuff already there, in preview or about to hit us with the vNext of SQL Server.
See it all in a foundation presentation by James Philips (t|l), Corporate VP at Microsoft.

Without further ado, here’s my list of points of interest – it may be a mess to you, but reflects my personal interest in the Microsoft tool stack at this moment.

SQL Server 2016

Strecth Database, for individual tables. See blog post by Marco Freccia, CTP2
Quick test, is this feature for me?

StretchDB

Multiple TempDB files. See blog post by Jeff Shurak, CTP2.4
SQL Server now defaults to 8 data files or the number of cores (read: threads), whichever is less, for the TempDB files.

AlwaysEncrypted, See blog post by TechNet, CTP3
Always Encrypted allows clients to encrypt sensitive data inside client applications and never reveal the encryption keys to the Database Engine

Native JSON Support, see blog post by Jovan Popovic, CTP3
Feature set is growing by each release of CTP, currently SQL Server can format and export data as JSON string, load JSON text in tables, extract values from JSON text, index properties in JSON text stored in columns and more to come.

Temporal Tables, see MSDN Article, CTP3
Allows you to keep a full history of data changes and allow easy point in time analysis. Temporal Tables is a new type of user table in SQL Server 2016

Row Level Security (RLS), see MSDN Article, CTP3
RLS enables you to implement restrictions on data row access. For example ensuring that workers can access only those data rows that are pertinent to their department, or restricting a customer’s data access to only the data relevant to their company.

PolyBase, see MSDN Article
PolyBase allows you to use T-SQL statements to access and query in an ad-hoc fashion data stored in Hadoop or Azure Blob Storage.

Parallel Partition Processing in Tabular, see blog post by Haidong Huang CTP2
Allows for faster processing of Tabular cubes. Mind the default settings though, read the blog post.

Single Package Deployment (Project Mode), see blog post by Andy Leonard (b|l|t)
Now you’ll be able to deploy a single package in a project, to fix a bug or similar scenario. Read the blog post, as there is no such thing, as a free lunch!

Azure

AlwaysEncrypted for Azure SQL Database, see blog post by MSDN, Preview

Read more about all Azure Preview Features here

Azure Data Lake Store
The Data Lake store provides a single repository where you can capture data of any size type and speed simply without forcing changes to your application as the data scales.

Azure Data Lake Analytics Service
The analytics service can handle jobs of any scale instantly by simply setting the dial for how much power you need. You only pay for your job when it is running making it cost-effective.

Azure IoT Hub
Connect, monitor, and control millions of IoT assets running on a broad set of operating systems and protocols.

Data Catalog
Data Catalog lets users—from analysts to data scientists to developers—register, discover, understand, and consume data sources.

SQL Data Warehouse
Azure SQL Data Warehouse is an elastic data warehouse as a service with enterprise-grade features based on the SQL Server massively parallel processing architecture.

If that’s not enough for you, check out the impressive set of Azure services here.

Power BI

I can’t keep up!! (which is probably a good thing)

Duplicate Report Page, read the Power BI weekly update blog
A common scenario when creating reports is to have multiple pages that are identical except for having different filters applied.

Collapse Navigation Pane though an URL parameter, read the Power BI weekly update blog
Allows you to add an URL parameter to your link that will automatically collapse the left navigation pane for any visitor who clicks the link.

Full Screen Mode, read the Power BI weekly update blog
Enables Full Screen Mode for Power BI dashboards and reports.

If you want to see some of the amazing things you can already do in Power BI, please visit the Power BI Best Visual Contest page

Not to mention all the features updated each month in the Power BI Desktop application, see latest updates here.

If you find something missing, Microsoft is actually listening, so please feel free to register and suggest your fantastic new idea at this site.

Loading