Testing your SSAS partitioning strategy w/ PowerShell

During a presentation of mine, there was a discussion going on, about what partitioning strategy to use when partitioning cubes. Most frequently it seems people are partitioning by some form of period, e.g. by Years, Months or Weeks. Rationally it may seem like a good idea, at the time. But wouldn’t it be a more fact based approach to actually put the strategy to a test?

Preface

There are several ways of approaching cube, or more precisely, measure group  partitioning. One approach is to simply define the partitions in the Visual Studio Data Tools [SSDT] project and then deploy/process the database for testing. This process is cumbersome and very manual, which in the end, very likely, can lead to erroneous conclusions.
On codeplex, there is a project called ASStoredProcedure which is a collection of Stored Procedures (compiled C# code). By installing the assembly on a given SSAS instance, you get access to use all kinds of cool methods.

For more information on custom assemblies in Analysis Services, read this and this.

In the resulting assembly is a method called CreatePartitions(…)
CreatePartitions(CubeName, MeasureGroupName, SetString, [PartitionGrouperExpressionString])

The outcome of calling this method is a measure group that is partitioned by the members present in the designated set. In the following example the measure group Internet Sales is going to be partitioned by Year.

Code Example

call ASSP.CreatePartitions("Adventure Works", "Internet Sales", "[Date].[Calendar Year].[Calendar Year].Members")

It’s important to keep some of the obvious draw backs of this approach in mind.
First of all, you need to have a fully processed cube, in order to execute the method. Having only the measure group and the dimension in question processed is not enough. This means, that if the cube is considerable in size, the pain of processing will be double during the creation of the partitions. Initially process in order to create the partitions, then process the partitions – you can elect to process the cube the second time by Default rather than Full, which will detect changes in the Measure Groups in question and only process those.

Second, if data during a future process, exceeds the given boundaries of the partitions (specified in the slice attribute – which the AS Stored Procedure will set at the time of creation) processing will break. One example could be that the underlying data source provides a rolling window, and if a specified partition has no data, processing will break. This behavior was a bit surprising to me. So you need to re-create partitions on a regular basis. As often as your “grain” on the partitions allow for spill. This is particularly hurtful when/if the whole cube needs re-processing each and every time data is updated.

Semi-Automation

Obviously everyone can execute MDX of the back in SSMS. But the trick is to use PowerShell to do the hard work for you. With a few lines of code, we can easily set up the whole test – you would want to test all your theses.

First we create two helper functions, to assist with the repetitiveness.

Import-module "sqlps" –disablenamechecking
Import-module "sqlascmdlets"

cls;

function ExecuteTestMDX() {
	$result = @()
        #Single MDX Statement
	$Query = [System.IO.File]::ReadAllText("C:\MDXs\Test.mdx")
	
	Invoke-ASCmd -Server "<SERVERNAME>" -Database "<DATABASENAME>" -Query "<ClearCache xmlns=`"http://schemas.microsoft.com/analysisservices/2003/engine`"><Object><DatabaseID><DATABASENAME></DatabaseID></Object></ClearCache>" | Out-Null
	#Write-Host "Executing MDX`r"
	if( $query -ne $unll ) {
                #Querying 10 times
		for( $i = 0; $i -lt 10; $i++ ) {
			$BeginTime = Get-Date
			Invoke-ASCmd -Server "<SERVERNAME>" -Database "<DATABASENAME>" -Query $Query | Out-Null
			$EndTime = Get-Date
			Write-Host "." -NoNewline
			$result +=  ( $EndTime - $BeginTime ).TotalMilliseconds 
		}
	}
	Write-Host "`r"
	return $result
}

function CreatePartition( [string]$Set ) {
    #Write-Host $Server $Database $Cube $Set
	Invoke-ASCmd -Server "<SERVERNAME>" -Database "<DATABASENAME>" -Query "call ASSP.CreatePartitions(`"<CUBENAME>`", `"<MEASUREGROUPNAME>`", `"$Set`")" | Out-Null
	Write-Host "`r`nPartition Created"
	Invoke-ProcessCube -Server "<SERVERNAME>" -Database "<DATABASENAME>" -Name "<CUBENAME>" -ProcessType "ProcessDefault" | Out-Null
	Write-Host "Cube Processed"
	return $Set
}

Remember to replace <SERVERNAME>, <DATABASENAME> (don’t forget the clear cache XMLA statement), <CUBENAME> and <MEASUREGROUPNAME> with your own values. Also adjust the path for the MDX you want to have run against the cubes. I tried to parametrize the method but for some reason the function failed to convert the input to

When this is in place, we can loop the sets we want our measure group to be partitioned by. In my example, I create the following partition schemes: Year per Datasource, Datasource, Year, Week, Store and finally Chain. This is where your knowledge about both your data demographics and end users query statistics come into play. Remember, partitioning can improve both query and processing.

$Results = @()
$Sets = @("[Time].[Year Week Date].[Year] * [DataSource].[Datasource].[Datasource]", "[DataSource].[Datasource].[Datasource]", "[Time].[Year Week Date].[Year]", "[Time].[Year Week Date].[Week]", "[Store].[Store].[Store]", "[Store].[Chain].[Chain]" )

foreach( $Set in $Sets ) {
    Try {
        $Results += CreatePartition( $Set ) | Out-Null
        $Results += ExecuteTestMDX | Out-Null
    } Catch {
        Write-Host "Failed to create or query: " + $Set
    }
} 

$Results | Out-File -FilePath C:\SSAS\Output\Results.txt

Depending on the size of your data, this can be quite a time-consuming endeavour, which is why automating it makes a lot of sense.
Here’s how the IDE displays the progress

Cube Processing Progress
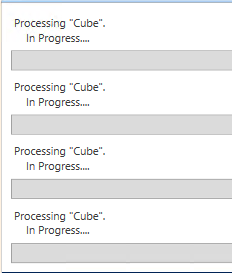
One after another, the cubes are processed. The Write-Host statements are covered by the graphics.

I left out one thing from this example; to test processing durations. This is, however an easy fix, as we can record the time at process begin as well as the time at process end, subtract the two and get the duration. This way, we can check how processing performance  is affected by the different partition schemes.

To view the rudimentary outcome, have a look in the file configured in the script. Timings will be listed as a long list of durations, like this:


Results

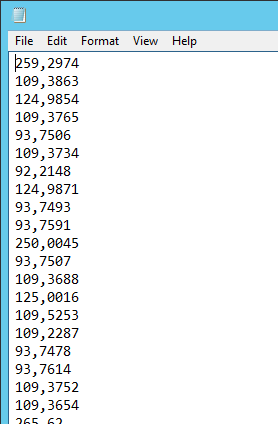
With this data, you can put your scheme to the test; Find out which partition scheme, if any at all, works best for your particular cube.

Loading

Speaking at Azure Birmingham UK User Group

SQL Server User Group MidlandsAs part of SQL Midlands User Group, Azure Birmingham UK User Group is hosting an event on April 6th 2017, 6:16 PM where I will be presenting on Custom Assemblies in Analysis Services.

A topic I have blogged about here and here, as well as presented at thisthis and this event on this particular topic. If you are in the area, you should pop by!

Have a look at the preliminary future events here.

UPDATE: This event has been cancelled due to SQLBits announced in the same week.

Loading

Speaking at #SqlSat569 / #SqlSatPrague

Just got news that I have been selected to speak at the SQL Saturday event in Prague, Czech Republic, on December 3rd. I am very exited and happy about that, as you can imagine.

Last time I was in Prague was in 1991, which in fact makes this a 25 yrs reunion – I guess things have changed slightly over the past two and a half decade. 😉

My talk will be about Pro Techniques for the SSAS MD Developer – Including Custom Assemblies, Partitioning, Synchronization, Integration Testing. I have previously presented this at a national User Group: MSBIP.

Hopefully the event will have a great turn up – check the event site here.

Loading

Raspberry PI Halloween Project: Creepy Greeting Skull

For some time I have been wanting to create a fun, engaging project with my two daughters, age seven and nine. As summer came to an end, they both began talking abort costumes for Halloween, and we even have a kind of get-together in one of their classes – with costumes and all.

Traditionally this is not a massively celebrated holiday in Denmark, but it’s on the rise and more and more are trick or treating. So it struck me, that we needed to have some device that would detect whenever someone approached the front door, they would be greeted by something spooky and/or frightening. Enter Skull!

Skull

I will be placing the RPi along with a PIR Sensor inside the skull. On account of size vs volume, the loudspeakers will not fit inside. I bought a standard set of computer loudspeakers which even came with a subwoofer, at a bargain of just DKK 200 ~ $30. I’ll have none of that portable speaker stuff – I want a lot of dB.

PIR Sensor

A bunch of nasty and creepy screams have been downloaded,  and will be used those to scare of any trick or treaters. Only thing to keep in mind is, the Windows 10 Core supports only .wav files out of the box.

In basic steps, the code will fire up, start listening to GPIO(4), where I hooked up the PIR sensor. Once the sensor detects a change, an event gets triggered, and a random sound bite will be played. After each sound bite, there is a period of 5-10 seconds of non-detection, where we ignore the sensor’s readings. After end non-detection, the PIR sensor reading can once again trigger a new sound bite.

The PIR Sensor is real easy to work with, as it requires only power, ground and then you get the read out.

I will post a video of the skull in action, once Halloween is over. This is how the Skull looks with the PIR Sensor attached with rubber bands. It’ll turn Cyberdyne eventually…

Skull Close Up

Get Code Here

PS: I have experienced a few hiccups during even this simple development process. Deploy from Visual Studio is as touchy as a teenage girl on a first date. It’s clear that development capabilities on the IoT platform is in the early stages. Error messages are funny, at best. Often they are really, really confusing.

The one thing I was spending most time on, was actually to get the BackgroundMediaPlayer to play. Turns out the attribute AutoPlay has to specifically be set to false. WTF?!

Well, here is the setting for the Skull – I am thinking it sitting right between the two pumpkins.

wp_20161029_14_18_39_pro

Happy Halloween everyone!

Loading

Testing Your #SSAS Cubes w/ Visual Studio

This is my ninth post in a series of entry-level posts, as suggested by Tim Ford (b|l|t) in this challenge.
I have not set any scope for the topics of my, at least, twelve (12) posts in this blog category of mine, but I can assure, it’ll be focused on SQL Server stuff. This time it’s going to be about how to create a consistent test setup of your Analysis Services (SSAS MD) databases, across servers, using build in features in Visual Studio (VS).

Previous Posts in Entry Level Serie:

Preface

This technique requires a tiny bit of C# programming (or VB if you prefer that) – But do not let this scare you off. I guarantee the effort pays of well in the end. But if you want to jump right into testing, I have shared some code in this blog post, that will get you going even faster.

Limitations

One of the main drawbacks of using this approach, is that test methods in VS does not support parameters. This means we have to create a method for each type of MDX we want to execute against a cube.

We can however execute the same MDX on multiple cubes, from the same method.

Depending on whether you test for consistency or performance, having the test methods run synchronously, one after the other, will either work for you or against you. We do, unfortunately not, have the liberty to choose execution mode as we see fit. This blog post sums up how to enable parallel testing, but in our case we do no meet the requirements which are (I have highlighted the ones we fail to meet):

  1. Ensure you have a multi-core/CPU machine
  2. Ensure you are running only unit tests
  3. Ensure your tests are thread-safe
  4. Ensure you do not have any data adapters on
  5. Ensure you are running locally
  6. Modify your test settings file.

The Code

We begin by creating a new Unit Test Project in Visual Studio.

New Unit Test Project

Once the project has been created, we can add classes to our project. Each of these classes can contain one (1) or more tests. In this example, I will expose two (2) tests to the Visual Studio test framework.

But before we can do any testing, some plumbing is in order. I have attached code to this blog post, in which there is a class that wraps the ADOMD class library as well as implements some easy of use functionality. This class is called Helper. In this implementation it contains a method to clear the cache of a cube, execute XMLA or MDX against a cube and finally a method to assert if two (2) CellSets are identical. The Helper class relies on settings found in the App.config file. You are free to make the code your own, but can use it as is.

Here is an example of one test you might have in a cube. Testing if the grand total of a specific measure [Internet Sales] stays consistent for each deployment.

Test Class

When we build our Visual Studio project, the Test Explorer will automatically pick up on any newly added test methods in any of the classes in the project. So you can add as many classes with as many (or few) methods you’d like.

Build
Build (right click) or [Ctrl]+[Shift]+[b]

Execution

In this quick introduction I will only show how to execute the test via the Test Explorer. Obviously this should be automated, as I will blog about in another post.

Knowing right away, that you introduced a bug into the code base, can save you hours of back tracking.

In the Test Explorer you can select any single test or multiple tests, then right-click and select Run Selected Tests.

Run Selected Tests

You will end up with a result in the same pane; either Success, Failure or Undecided. The last option is not included in this example, but is a viable option if you extend your unit/integration testing further.

My result looks like this:

Test OutcomeWith this test, we established that the grand total of the measure Customer Count was consistent across both versions of the cube. If this fails, you may be into trouble with either your data model, your cube script or something completely different. The test won’t tell what is wrong, only that you have an inconsistency.

Fail fast, fail often!

Wrap-Up

Unit/Integration testing in Visual Studio is actually not that hard and can save you a lot pain down the road. The testing framework in Visual Studio offers extensive ways of executing batches of tests. You can group tests by Class, Duration, Outcome, Trait or Project.

When you right-click a test, you get the option to select how you want the tests in the Test Explorer to be grouped.

Test Group By

Traits can be added as properties to the method declaration in the class. The attribute is called TestCategory and you can have multiple declarations per method. As you can probably tell, you can weave an intrinsic web of categories of test methods. In other words, one test method can be part of one or more schemes by which you test your code. You should test development deployments differently from test deployments, which again should be tested differently from production deployments.

Test Category

Or you can store tests in playlists by right clicking and adding them separately to one (1) or more playlists.

In the top of the Test Explorer, you select which playlist you want active.

Playlists

Happy testing 🙂

Clarification

After publishing this post, Fabrice Michellonet (b|l|t) did clarify the difference between Unit Testing, and what I am showing in this post; Integration Testing. Now, admittedly I hash tagged the tweet #UnitTesting, which was incorrect. However, it seems easy to fall into that trap, as Microsofts Test Template for this kind of project is Unit Test Project – even though you are not going to do any Unit Testing.

Microsoft Test Templates


Code available here: ssas-unittestproject

Loading